|
Tuesday, 03 February 2004
(Please see www.puppetkit.com/c/109 for more pictures and details on renting Bunnicula!)
Last fall I got a call to build a puppet for the Orlando Repertory Theatre. They were going to be doing a children's theatre production of Bunnicula and needed me to build their star rabbit puppet. They told me that the play was an adaptation of the children's book of the same name in which a family goes to the movie Dracula, finds a strange bunny in the movie theatre, and takes him home only to discover weird things happening to their vegetables at night. I found out there had recently been a production of it in Los Angeles, and I considered finding a photo of there rabbit as a basis for my puppet. However, with support from the director, Jeff Revels, I decided to see what I might design from my own imagination.
The first thing I did in designing Bunnicula was attend a production meeting held by Mr. Revels. There I met the other members of the production team and discovered some important facts about the bunny's height and script requirements. For example, Bunnicula had to hop, fall asleep, stretch his arms like a bat, open his mouth, and perk his ears. All of this had to be controlled by a puppeteer who would be dressed in black and fully visible from the audience. Some of the guidelines Mr. Revels shared were clearly laid out in the script, so I took a copy home to read and understand the actions required and the character relationships. When I was finished I went out looking for material on rabbits so I could make a drawing from my research results. I ended up borrowing a video tape about rabbits from my niece which gave me the information I needed. When I was done watching it I could close my eyes and see what Bunnicula should look like. It was then that I could make a detailed drawing that could be approved by the director and would give me the puzzle pieces I needed to build the puppet parts.
Next I traced the shapes onto chunks of foam rubber so I could sculpt a miniature model of the bunny. The body, legs, arms, ears, and head were carved separately and pinned in place to complete the rabbit's figure. Then I made markings on the foam to show where the seams would go when I began gluing pattern pieces together. (The idea is to imagine how a flat piece of 1/2" sheet foam could be rapped around, cut, and glued together to make the same shape you have just sculpted in three-dimensions. The markings show the darts and cuts you need to make.) Some of the parts didn't need to be patterned. I decided the legs and arms would be carved out of bigger pieces of foam later. Next I cut the little head and body foam shapes down the center lines and began focusing on cutting the smaller lines I made, but only on the one side. I only needed one side because I could just flip the pattern later to get a symmetrical look in my finished puppet. The only way I could then get a flat representation of my foam shapes was to shave the inside of the body and head pieces super thin and glue them down to a piece of paper. All of this effort gave me a small version of the patterns for the 1/2" sheet foam head and body.
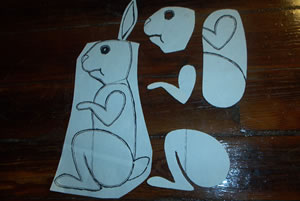 |
Here is the drawing I made of Bunnicula and the puppet parts that look like puzzle pieces.
|
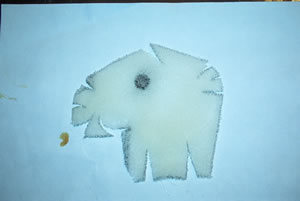 |
Here is the foam head cut down the middle, sliced on the darts, shaved super thin, and glued to a piece of paper to show how to trace the 1/2" sheet foam pattern.
|
 |
It was now time to get out the opaque projector. By projecting the original drawing up on a wall I could find the distance between the projector and the wall that represented the rabbit's ideal height. I then traced a master drawing of Bunnicula so I could work out the mechanical movements and decide where I wanted to put an aluminum framework.
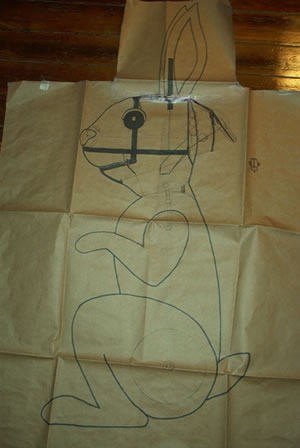
Here is the master drawing showing the perfect size and height of Bunnicula. |
 |
Also, now that this distance was set, I could trace all of the foam shapes and the other body parts onto pieces of construction paper to make the life-size patterns and they would all be in perfect relationship with each other.
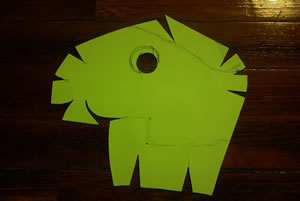
Here is the head shape traced onto construction paper from the projected miniature foam head.
|
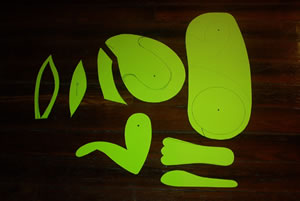 |
Here are the final body patterns traced from the projected original drawing.
|
 |
Up until now I had spent a couple of days researching, designing, and setting the patterns, but now came the hard part of turning all of that preparation into a living breathing bunny. It took me a week or more to glue together the patterns, carve the legs and arms out of foam, make an
aluminum frame that hinges could be bolted into for the cable mechanisms, and figure out a spring assembly to make the 2" wood ball rotate to get the appearance of blinking eyes.
In addition I had a brain storm to make the nose twitch and created an extra trigger for the nose which I had cast in rubber so he would have a realistic look. I managed this while having a small emergency in my home. The mechanical parts in my toilet tank decided to break and flooded a third of my house. I had to peel up the carpet and
dry it out before I could continue building Bunnicula. However, with help from my wife and an impatient rabbit watching me we got the small disaster under control, and I was able to then glue and sew the fur onto the bunny's
body.
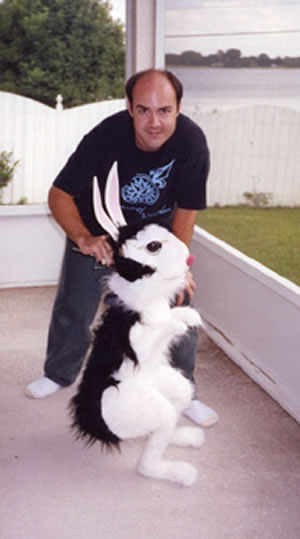
Here Bunnicula is almost finished. |
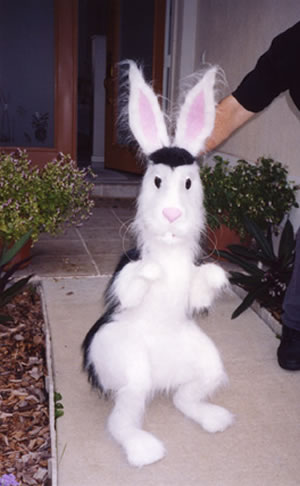 |
Bunnicula was born on October 16th, 2003 and bounced out of my house to perform 78 shows for the Orlando Repertory Theatre through November 23rd, 2003. He was well received by the press and currently is looking for an agent.
|
|